


HOW TO PLANT AND GROW BULBS
Flower bulbs are beloved, in the United States and globally, for their easy care and vast variety. Whether planning an early spring garden with crocus and snowdrops, a classic array of tulips and daffodils, or a summer collection of hyacinths and gladiolus, you'll find yourself working with bulbous plants. Luckily, these are some of the lowest-maintenance plants in your garden. With just a little planning, you can enjoy years of flourishing bulbs--many species even naturalize and multiply.
In very cold, northern zones, fall planting means planting in early September. After planting, cover your bulb garden with mulch or hay to protect tender bulbs or roots from injury from the cold. In a bitter winter without much snow cover, an extra layer of protection will go a long way in keeping your plants happy.
In Midwest and Southern zones, fall-planted bulbs should go into the ground in late October or November. If winter temperatures don't touch the single digits, mulching may not be necessary--although many gardeners like the look of a winter-time mulch application. For places that don't experience a freeze, planting can be done around New Year's Day, and the best bulbs are ones that are bred for warmer weather. In Zones 9-11, fall-planted bulbs can benefit from storage in the refrigerator for a few weeks before planting. Set your bulbs in a cool, dry area for six to eight weeks before planting, and keep them separate from produce in the fridge using boxes or paper bags.
Summer-blooming Dutch Bulbs and perennials are not fussy about soil -- provided it is not too heavy and sticky. If soil is heavy, loosen it with lots of humus, sand, gypsum, etc. If very light, add moisture holders -- humus, peat mold, etc. If you have a soil with a high clay content, it can be improved by adding compost, peat moss or some other source of organic material. The organic material should be worked in the top twelve inches of soil (eighteen inches is even better).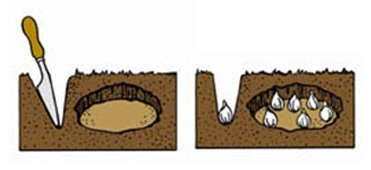 The general rule of thumb for planting
spring bulbs is to plant two to three times as deep as the bulbs is tall.
This means most large bulbs like tulips or daffodils
will be planted about 6 inches deep while smaller bulbs
will be planted 3-4 inches deep. The depth of planting should be measured
from the surface level of the soil to the shoulder of the bulb and the
eyes or crowns of the perennials.Distance between plants is measured from the center of one plant to the
center of the next.
The general rule of thumb for planting
spring bulbs is to plant two to three times as deep as the bulbs is tall.
This means most large bulbs like tulips or daffodils
will be planted about 6 inches deep while smaller bulbs
will be planted 3-4 inches deep. The depth of planting should be measured
from the surface level of the soil to the shoulder of the bulb and the
eyes or crowns of the perennials.Distance between plants is measured from the center of one plant to the
center of the next.
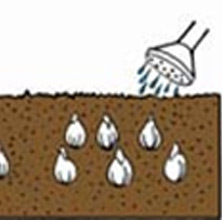
There are two basic methods of planting. One is to dig individual holes for each plant. This can be done with a garden trowel or one of the special hole-cutting tools called bulb planters. Dig the hole several inches deeper than the recommended planting depth and fill to base level with a mixture of loose soil and Breck's Food for Bulbs and Perennials. Then place your plant in the hole and cover it with loose soil. Using your fingers, gently push the soil into position around the plant so there will be no air pockets where water can collect.
If you are planting a quantity of plants in a single area, you may want to dig an entire bed to planting depth. Then you can locate each plant just where you want it before covering with soil. Press the soil into position around each plant to eliminate air pockets.
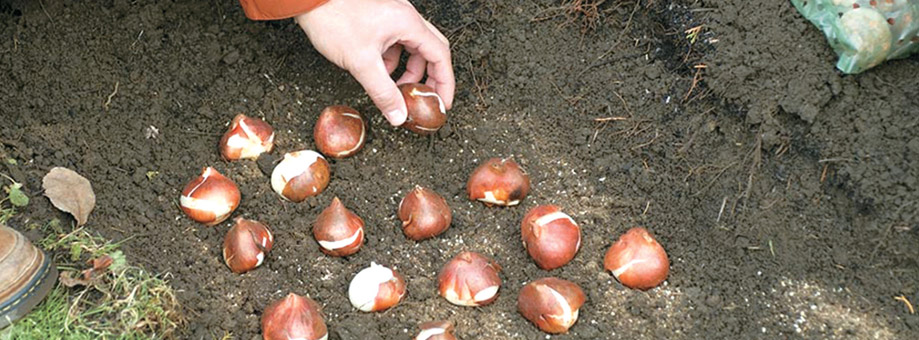
Plant enough Bulbs for a showy display. For best appearance, plant bulbs in masses. Space bulbs in bed according to the size of the bulb. As a general rule, large bulbs, such as Tulips and Daffodils should be spaced 3 to 6 inches apart. Small bulbs, like crocus and snowdrops, should be spaced 1 to 2 inches apart. To find the exact measurements for your bulbs, visit our Planting Guide Chart here.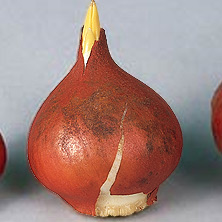 One of the most frequently asked questions about planting Bulbs is, "Which end goes up?"
Most true bulbs, such as Tulips and Daffodils, have pointed
tips which should point upward. Corms, tubers and
rhizomes usually show sprouts on their upper sides, and these should be on
top when planted. Some of the smaller bulbs,
such as Poppy Anemones, look like
small dried peas or small stones and can be planted in any direction -
their shoots will find their way toward the sun.
One of the most frequently asked questions about planting Bulbs is, "Which end goes up?"
Most true bulbs, such as Tulips and Daffodils, have pointed
tips which should point upward. Corms, tubers and
rhizomes usually show sprouts on their upper sides, and these should be on
top when planted. Some of the smaller bulbs,
such as Poppy Anemones, look like
small dried peas or small stones and can be planted in any direction -
their shoots will find their way toward the sun.
 Average spring conditions should provide enough moisture for your bulbs.
However, if the weather is unusually hot and dry, a weekly deep soaking
will produce larger, longer-lasting blooms. For both spring
and Summer Bulbs, start watering when the flower buds first appear on the plant if the soil is
dry. Remember that the bulbs may have been planted 6 to 8 inches deep and the water needs to soak to
that depth. Through the bud, bloom and early
foliage stage, add about one inch of water per week if this amount has not
been supplied from rainfall. Water with a soaker hose to keep water off
the bloom. Bulbs like Alliums, or the shallow
planted bulbs, will rot quickly if over-watered in the heat of
summer.
Average spring conditions should provide enough moisture for your bulbs.
However, if the weather is unusually hot and dry, a weekly deep soaking
will produce larger, longer-lasting blooms. For both spring
and Summer Bulbs, start watering when the flower buds first appear on the plant if the soil is
dry. Remember that the bulbs may have been planted 6 to 8 inches deep and the water needs to soak to
that depth. Through the bud, bloom and early
foliage stage, add about one inch of water per week if this amount has not
been supplied from rainfall. Water with a soaker hose to keep water off
the bloom. Bulbs like Alliums, or the shallow
planted bulbs, will rot quickly if over-watered in the heat of
summer.
When to Plant Bulbs
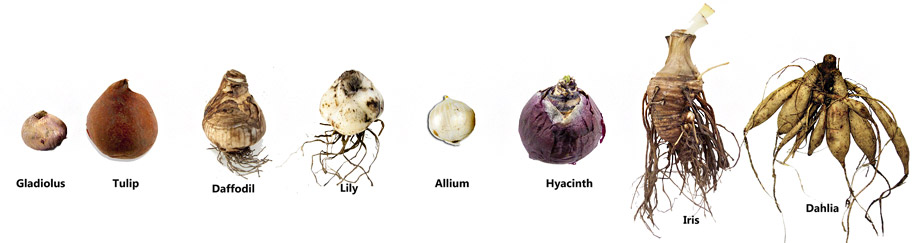
When should you plant flower bulbs? It depends upon their bloom time. In general, spring-blooming bulbs like tulips, daffodils, crocus, and muscari are planted in the fall, while summer-blooming bulbs like dahlias and gladiolus are planted in the spring.Planting fall-planted bulbs:
Fall-planted bulbs perform best when planted early enough to establish a few roots before the ground freezes, but not so early that they'll sprout and suffer frostbite. The bulbs will have time to get established before the cold winter, then experience the warming period needed to get growing!In very cold, northern zones, fall planting means planting in early September. After planting, cover your bulb garden with mulch or hay to protect tender bulbs or roots from injury from the cold. In a bitter winter without much snow cover, an extra layer of protection will go a long way in keeping your plants happy.
In Midwest and Southern zones, fall-planted bulbs should go into the ground in late October or November. If winter temperatures don't touch the single digits, mulching may not be necessary--although many gardeners like the look of a winter-time mulch application. For places that don't experience a freeze, planting can be done around New Year's Day, and the best bulbs are ones that are bred for warmer weather. In Zones 9-11, fall-planted bulbs can benefit from storage in the refrigerator for a few weeks before planting. Set your bulbs in a cool, dry area for six to eight weeks before planting, and keep them separate from produce in the fridge using boxes or paper bags.
What's the best time for planting fall-planted bulbs by zone?
- Zone 1 (below -50° F): First week of September
- Zone 2 (-50 to -40° F): First week of September
- Zone 3 (-40 to -30° F): Second to third week of September
- Zone 4 (-30 to -20° F): Last week of September or first week of October
- Zone 5 (-20 to -10° F): First week of October
- Zone 6 (-10 to 0° F): Second or third week of October
- Zone 7 (0 to 10° F): First week of November
- Zone 8 (10 to 20° F): First week of November
- Zone 9 (20 to 30° F): First week of December, and bulbs should be chilled in the refrigerator before planting
- Zone 10 (30 to 40° F): Second week of December, and and bulbs should be chilled in the refrigerator before planting
- Zone 11 (Above 40° F): Last week of December, and bulbs should be chilled in the refrigerator before planting
Spring-planted bulbs:
Many spring-planted bulbs are actually rhizomes, not true bulbs. Begonias, lilies, cannas, and lots of other May-June-July bloomers fall into this category. Because they grow from rhizomes, these summer-blooming perennials do not need a cold period to begin the growing process--plant them in the spring, and they'll bloom in just a few months. Spring-planted bulbs can be planted after the last frost date in your zone.What's the best time for planting spring-planted bulbs by zone?
- Zones 1-3: May to July, and plants will need to be lifted after growing season
- Zones 4-7: May to June
- Zones 8-11: Late March to early May
How to Prepare Your Soil for Bulbs
Fall is the prime time for planting of hardy spring flowering bulbs. Bulbs and perennials need plenty of water and good drainage. If water has a tendency to stand in the planting area, you'll want to break up hard sub-soil and put in a layer of drainage material such as coarse gravel, broken stone or sifted cinders below your surface soil.Summer-blooming Dutch Bulbs and perennials are not fussy about soil -- provided it is not too heavy and sticky. If soil is heavy, loosen it with lots of humus, sand, gypsum, etc. If very light, add moisture holders -- humus, peat mold, etc. If you have a soil with a high clay content, it can be improved by adding compost, peat moss or some other source of organic material. The organic material should be worked in the top twelve inches of soil (eighteen inches is even better).
How to Fertilize Bulbs
Most vegetable and produce gardeners rely on soil amendments and fertilizers to improve their crop, but fertilizer isn't just for agriculture. Perennials and bulbs can benefit from added nutrients, too, and you'll enjoy taller stems and more blooms as a result. The key to fertilizing bulbs: mix flower food or bulb fertilizer with the soil. Don't apply fertilizer directly to bulbs, as heavy contact can cause burning. Add a nitrogen-rich fertilizer to the soil when you plant, and sprinkle more on the ground above your bulbs in the springtime. Commercial fertilizers list three bold numbers on their packaging. The first number indicates the percentage of nitrogen per pound, the second number is the percentage of phosphate, and the third number is the percentage of potash. Look for a 5-10-5 or 10-10-10 fertilizer for bulbs.How to Choose a Location for Planting Bulbs
Before selecting the location to plant bulbs in the landscape, consider the light requirements of the plant. Does the plant require full sunshine, partial shade or full shade? Since early spring bulbs bloom before most trees shrubs leaf out, they can successfully be planted under trees and shrubs. Many summer blooming bulbs require full sun or partial shade. Spring bulbs planted on a south slope will bloom earlier than the same bulbs planted on a north slope. Spring Bulbs planted on a hillside will bloom earlier than bulbs planted in a valley. Cold air is heavier than warm air and behaves like water. It flows down the slope, settling in the low areas.Bulb Planting Depth
The general rule of thumb for planting
spring bulbs is to plant two to three times as deep as the bulbs is tall.
This means most large bulbs like tulips or daffodils
will be planted about 6 inches deep while smaller bulbs
will be planted 3-4 inches deep. The depth of planting should be measured
from the surface level of the soil to the shoulder of the bulb and the
eyes or crowns of the perennials.Distance between plants is measured from the center of one plant to the
center of the next. There are two basic methods of planting. One is to dig individual holes for each plant. This can be done with a garden trowel or one of the special hole-cutting tools called bulb planters. Dig the hole several inches deeper than the recommended planting depth and fill to base level with a mixture of loose soil and Breck's Food for Bulbs and Perennials. Then place your plant in the hole and cover it with loose soil. Using your fingers, gently push the soil into position around the plant so there will be no air pockets where water can collect.
If you are planting a quantity of plants in a single area, you may want to dig an entire bed to planting depth. Then you can locate each plant just where you want it before covering with soil. Press the soil into position around each plant to eliminate air pockets.
Plant enough Bulbs for a showy display. For best appearance, plant bulbs in masses. Space bulbs in bed according to the size of the bulb. As a general rule, large bulbs, such as Tulips and Daffodils should be spaced 3 to 6 inches apart. Small bulbs, like crocus and snowdrops, should be spaced 1 to 2 inches apart. To find the exact measurements for your bulbs, visit our Planting Guide Chart here.
When Planting Bulbs, Which End is Up?
One of the most frequently asked questions about planting Bulbs is, "Which end goes up?"
Most true bulbs, such as Tulips and Daffodils, have pointed
tips which should point upward. Corms, tubers and
rhizomes usually show sprouts on their upper sides, and these should be on
top when planted. Some of the smaller bulbs,
such as Poppy Anemones, look like
small dried peas or small stones and can be planted in any direction -
their shoots will find their way toward the sun.How Often to Water Bulbs After Planting
Water the Bulbs well following planting. This will help settle the soil in the planting bed plus provide needed moisture for the bulbs to start rooting. Fall planted bulbs must root before cold weather. Avoid over-watering at planting time since this can result in bulb rot.
Average spring conditions should provide enough moisture for your bulbs.
However, if the weather is unusually hot and dry, a weekly deep soaking
will produce larger, longer-lasting blooms. For both spring
and Summer Bulbs, start watering when the flower buds first appear on the plant if the soil is
dry. Remember that the bulbs may have been planted 6 to 8 inches deep and the water needs to soak to
that depth. Through the bud, bloom and early
foliage stage, add about one inch of water per week if this amount has not
been supplied from rainfall. Water with a soaker hose to keep water off
the bloom. Bulbs like Alliums, or the shallow
planted bulbs, will rot quickly if over-watered in the heat of
summer.How to Care for Bulbs
How to Care for Bulbs After Flowering
After the blooming period ends, bulbs continue to collect energy via their leaves, then go dormant. Be sure to leave the foliage until it dies back naturally. When the dormant period begins, you'll notice that the plant's foliage has gone brown and papery and can easily be pulled free. Keep in mind that after flowering, the plant needs the green leaves to manufacture food (photosynthesis) that is stored in the bulb for next year's growth. If you mow or remove the foliage too early, the plant can no longer manufacture nutrient reserves for next year. This results in a small, weak bulb which will gradually decline and die out.Caring for Spring Bulbs
Early-spring bulbs tend to be a little lower-maintenance than late-spring bulbs after flowering, but nearly all bulbs are easy to care for. Early-blooming bulbs like snowdrops, crocus, daffodils, and grape hyacinths will come back year after year. You won't need to deadhead these plants, and you need only divide them if you want to add new plants to other parts of your yard. For later-blooming spring bulbs, you may wish to deadhead the plants after the flowers fade to keep them looking clean. Allow the foliage to die all the way back before cutting back to the groundCaring for Summer Bulbs
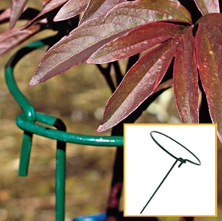
The foliage on larger, summer-flowering bulbs like gladiolus will take several weeks to die back. In temperate and chilly climates, you may need to lift and store the bulbs over winter. In late fall, use a garden fork to gently lift the bulbs. Brush off excess dirt, and store the bulbs in layers of paper or newsprint in a cool, but not freezing, location over winter.How to Stake Bulbs After Flowering
Some of the Summer Blooming Bulbs like Dahlias and tall, flowering gladioli occasionally need extra support to be able to remain erect. A plant support ring is an easy way to support plants that have weak stems. Stakes will also work for this purpose. A good practice is to actually put the stake into place at planting time to avoid accidental damage to the bulbs or tubers. If you love Glads, but do not want to stake them, then you will want to plant our Glamini Glads, which do not require staking! Plant support hoops can also be a big help to peonies who have heavy big blooms that tend to fall to the ground.
Caring for Bulbs After Blooms Fade
Flowers should be removed when petals begin to fade, so they will not go to seed. If seed pods are allowed to remain, they will draw off the food needed to nourish your bulbs for next year's growth. All petals should be removed from the blooming area after they have fallen. Even where bulbs have been naturalized in a lawn, leaves should not be cut until they turn yellow and whither naturally. While they are still green, the leaves serve as a source of nourishment to the bulbs.Mulching Tips for Bulbs
A year-round mulch of compost, leafmold, leaves or commercial types of mulch has a positive effect on your Bulbs and other flowers by keeping the soil from drying out, maintaining a more even soil temperature and reducing weed growth. It also prevents soil from splashing onto the flowers and foliage.Other Helpful Tips
- A year-round mulch of compost, leaf mold, leaves or commercial types of mulch has a positive effect on your Bulbs and other flowers by keeping the soil from drying out, maintaining a more even soil temperature and reducing weed growth. It also prevents soil from splashing onto the flowers and foliage.
- There are several ways to divert attention from the yellowing bulb foliage. Interplant the bulbs in the spring using one or two colours of annuals. Place bulbs behind the plants on the front edge of a border planting. Plant taller flowering bulbs behind lower growing foreground shrubs. Plant bulbs with groundcovers and perennials like hosta or daylilies. Use your imagination when it comes to planting your bulbs and you can get creative enough to hide the dying foliage.
- Over winter, bulbs can be susceptible to squirrels and other critters seeking food. If you have an issue with squirrels or mice digging up your bulbs, layer a piece of chicken wire over your planting location to protect your bulbs.
- Consider planting bulbs that bloom at different times, to extend the blooming season. With the right timing, you can keep the colorful show going from spring to fall.
- Bulbs do not require water during the dormant season. Water them in once when planting your bulbs, and keep them watered regularly during the growing season, but don't water them when they are in the ground.